Using components examples
Securely configure Cloudinary
- After you run the installation command for
@nuxtjs/cloudinary, copy and paste the following to yournuxt.config.jsfile:
modules: [
  '@nuxtjs/cloudinary',
],
cloudinary: {
  cloudName: process.env.CLOUDNAME,
  apiKey: process.env.API_KEY, //only needed if you are using server-side upload
  apiSecret: process.env.API_SECRET, //only needed if you are using server-side upload
  useComponent: true //use Vue components
}
- Create an
.envfile in your project's root directory with the following details
CLOUDNAME=replace_this_with_your_cloudname
API_KEY=replace_this_with_your_api_key
API_SECRET=replace_this_with_your_api_secret_key
Remember to add .env to .gitignore to avoid commiting and pushing it to remote repo by accident.
Display a Cloudinary-stored image as avatar
You can easily generate a version of your image as a 200x200 in size, round and auto-cropping avatar, with the following steps:
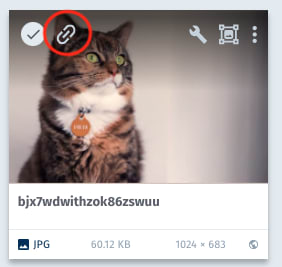
- Get your asset's
publicIdby clicking on "Link" icon
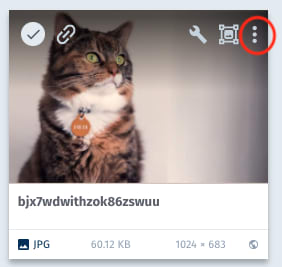
Or you can click on the "Settings" icon
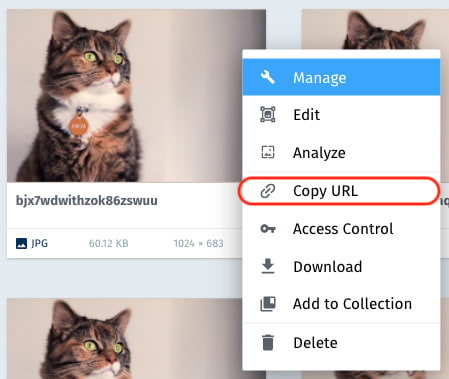
Then select "Copy Url"
Finally, delete all the fields in the copied URL except the part path-to-image following the below patterns. That's our publicId
- Display the asset using the following code:
Apply transformations on CldImage
<template>
  <div>
    <cld-image
      :public-id="publicId"
      width="200"
      height="200"
      crop="fill"
      gravity="auto:subject"
      radius="max"
      fetchFormat="auto"
      quality="auto"
      alt="An image example with Cloudinary"
    />
  </div>
</template>
<script>
export default {
  data() {
    return {
      publicId: "replace-your-asset-public-id-here"
    }
  }
}
</script>
Apply transformations using nested CldTransformation
<template>
  <div>
    <cld-image
      :public-id="publicId"
      alt="An image example with Cloudinary"
    >
      <cld-transformation
        fetchFormat="auto"
        quality="auto"
      />
      <cld-transformation
        width="200"
        height="200"
        crop="fill"
        gravity="auto:subject"
        radius="max"
      />
    </cld-image>
  </div>
</template>
<script>
export default {
  data() {
    return {
      publicId: "replace-your-asset-public-id-here"
    }
  }
}
</script>
Display image with a placeholder while loading
The following example shows how to get a placeholder with a pixelate effect while image is loading:
<template>
  <div>
    <cld-image
      :public-id="publicId"
      width="200"
      height="200"
      crop="fill"
      gravity="auto:subject"
      radius="max"
      fetchFormat="auto"
      quality="auto"
      alt="An image example with Cloudinary"
    >
      <cld-placeholder type="pixelate" />
    </cld-image>
  </div>
</template>
<script>
export default {
  data() {
    return {
      publicId: "replace-your-asset-public-id-here"
    }
  }
}
</script>
Display a remote image via Cloudinary
Let's fetch the below remote image via Cloudinary:

And display it as 200x200 in size, round and auto-cropping avatar:

The example code is as below:
<template>
  <div>
    <cld-image
      :public-id="publicId"
      type="fetch"
      width="200"
      height="200"
      crop="fill"
      gravity="auto:subject"
      radius="max"
      fetchFormat="auto"
      quality="auto"
      alt="An image example with Cloudinary"
    >
      <cld-placeholder type="pixelate" />
    </cld-image>
  </div>
</template>
<script>
export default {
  data() {
    return {
      publicId: "https://icatcare.org/app/uploads/2018/07/Thinking-of-getting-a-cat.png"
    }
  }
}
</script>
Using different account for a specific Cloudinary-stored image
In many cases we want to display images from different Cloudinary cloud/account than the main configured cloudName. We can do it with by passing the desired configurations as props to CldImage.
<template>
  <div>
    <cld-image
      cloud-name="demo"
      public-id="basketball_in_net"
      width="200"
      height="200"
      crop="fill"
      gravity="auto:subject"
      radius="max"
      fetchFormat="auto"
      quality="auto"
      alt="An image example with Cloudinary"
    >
      <cld-placeholder type="pixelate" />
    </cld-image>
  </div>
</template>
Make an image responsive
We use responsive flag attribute to achieve this. responsive can be either a Boolean, or a width (resize according to width changes), or height (resize according to height changes), or fill mode. If it is turned on, by default it will resize according to width changes.
<cld-image
  cloud-name="demo"
  public-id="basketball_in_net"
  responsive
  fetchFormat="auto"
  quality="auto"
  alt="An image example with Cloudinary"
/>
Make an image lazy loaded
We use loading flag attribute to achieve this. If the browser supports lazy loading, it will use that feature automatically. Otherwise, it will fallback to our own lazy loading algorithm.
<cld-image
  cloud-name="demo"
  public-id="basketball_in_net"
  loading="lazy"
  fetchFormat="auto"
  quality="auto"
  alt="An image example with Cloudinary"
/>


