Basic usage examples
All the below examples are done using
Securely configure Cloudinary
- After you run the installation command for
@nuxtjs/cloudinary, copy and paste the following to yournuxt.config.jsfile:
modules: [
  '@nuxtjs/cloudinary',
],
cloudinary: {
  cloudName: process.env.CLOUDNAME,
  apiKey: process.env.API_KEY, //only needed if you are using server-side upload
  apiSecret: process.env.API_SECRET, //only needed if you are using server-side upload
}
- Create an
.envfile in your project's root directory with the following details
CLOUDNAME=replace_this_with_your_cloudname
API_KEY=replace_this_with_your_api_key
API_SECRET=replace_this_with_your_api_secret_key
Remember to add .env to .gitignore to avoid commiting and pushing it to remote repo by accident.
Display a Cloudinary-stored image as avatar
You can easily generate a version of your image as a 200x200 in size, round and auto-cropping avatar, with the following steps:
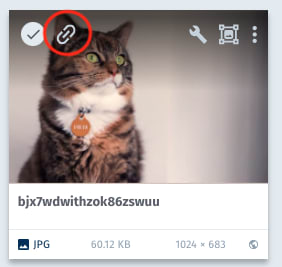
- Get your asset's
publicIdby clicking on "Link" icon
Or you can click on the "Settings" icon
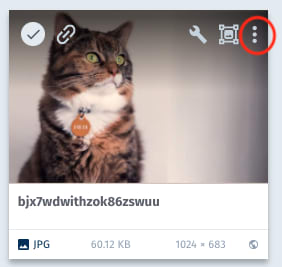
Then select "Copy Url"
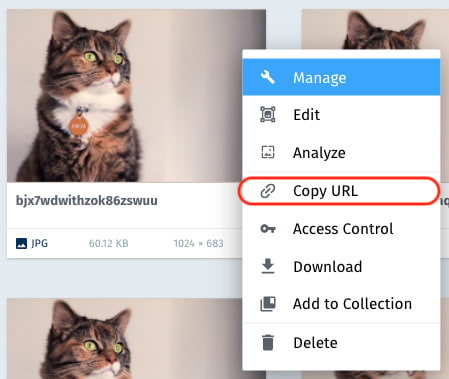
Finally, delete all the fields in the copied URL except the part path-to-image following the below patterns. That's our publicId

- Display the asset using the following code:
From a local state variable
<template>
  <div>
    <img :src="src" alt="An image example with Cloudinary" />
  </div>
</template>
<script>
export default {
  data() {
    return {
      src: this.$cloudinary.image.url(
          'paste-path-to-image-here',
          {
            gravity: 'auto:subject',
            width: '200',
            height: 200,
            crop: 'fill',
          radius: 'max',
          }
        )
    }
  }
}
</script>
From asyncData
<template>
  <div>
    <img :src="src" alt="An image example with Cloudinary" />
  </div>
</template>
<script>
export default {
  asyncData ({ $cloudinary }) {
    const src = this.$cloudinary.image.url(
        'paste-path-to-image-here',
        {
          gravity: 'auto:subject',
          width: '200',
          height: 200,
          crop: 'fill',
          radius: 'max',
        }
      )

    return { src }
  }
}
</script>
From computed for dynamic urls
<template>
  <div>
    <img :src="src" alt="An image example with Cloudinary" />
  </div>
</template>
<script>
export default {
  data() {
    return {
      url: 'paste-path-to-image-here'
    }
  },
  computed: {
    src() {
      return this.$cloudinary.image.url(
        this.url,
        {
          gravity: 'auto:subject',
          width: '200',
          height: 200,
          crop: 'fill',
          radius: 'max',
        }
      )
    }
  }
}
</script>
For readability and easy maintainance, you can also wrap this.$cloudinary.image.url inside a component method and call that method when needed instead:
<template>
  <div>
    <img :src="src" alt="An image example with Cloudinary" />
  </div>
</template>
<script>
export default {
  data() {
    return {
      url: 'paste-path-to-image-here'
    }
  },
  methods: {
    fetchRemote(url, options = {}) {
      return this.$cloudinary.image.url(url, options)
    }
  },
  computed: {
    src() {
      return this.fetchRemote(
        this.url,
        {
          gravity: 'auto:subject',
          width: '200',
          height: 200,
          radius: 'max',
          crop: 'fill',
        }
      )
    }
  }
}
</script>
Using different account for a specific Cloudinary-stored image
In many cases we want to display images from different Cloudinary cloud/account than the main configured cloudName. We can do it with $cloudinary.config().
<template>
  <div>
    <img :src="src" alt="A remote image example with Cloudinary" />
  </div>
</template>
<script>
const newCloud = 'demo' //replace this with your target account's cloudName

export default {
  async asyncData({ $cloudinary }) {
    const cloudinary = $cloudinary.config({ cloud_name: newCloud })

    const src = cloudinary.image.url('basketball_in_net', {
      width: 200,
      height: 300,
      crop: 'fill',
      gravity: 'auto'
    })
  }
}
</script>
The above example code generates an image whose width is 200px, height is 300px. Also it has auto-focus on the main object when cropping using Cloudinary auto detection algorithm.

Note that the original instance's configurations stay the same. this.$cloudinary.image.url() will use the default settings given in nuxt.config.js in the installation.
Display a remote image via Cloudinary
Let's fetch the below remote image via Cloudinary:
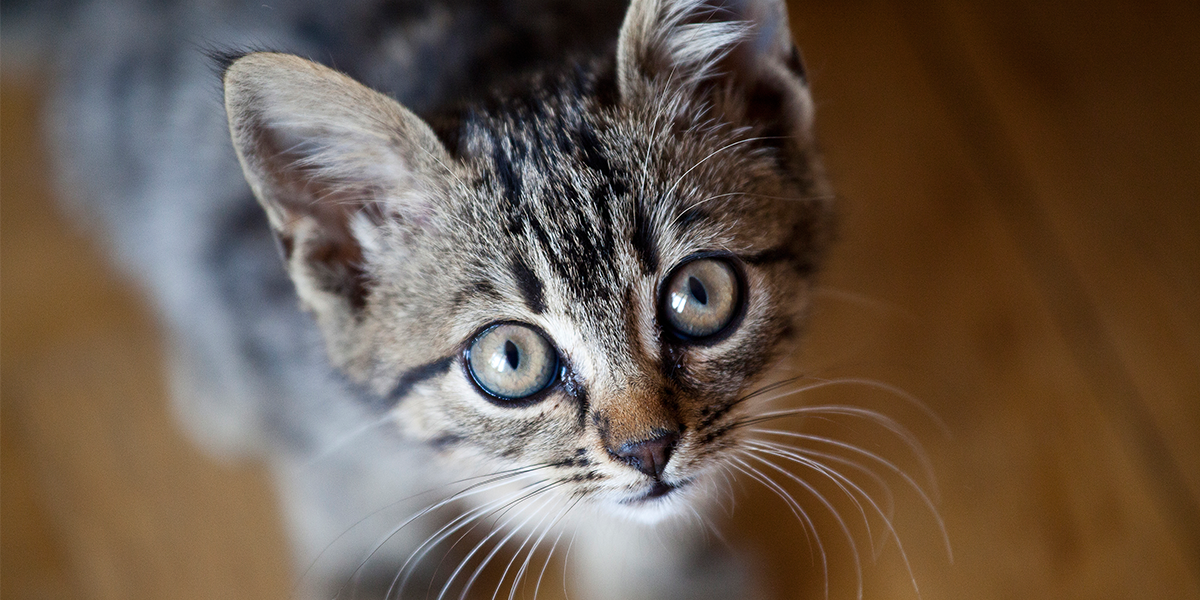
And display it as 200x200 in size, round and auto-cropping avatar:

From a local state variable
<template>
  <div>
    <img :src="src" alt="A remote image example with Cloudinary" />
  </div>
</template>
<script>
export default {
  data() {
    return {
      src: this.$cloudinary.image.fetchRemote(
          'https://icatcare.org/app/uploads/2018/07/Thinking-of-getting-a-cat.png',
          {
            gravity: 'auto:subject',
            width: '200',
            height: 200,
            crop: 'fill',
            radius: 'max',
          }
        )
    }
  }
}
</script>
From asyncData
<template>
  <div>
    <img :src="src" alt="A remote image example with Cloudinary" />
  </div>
</template>
<script>
export default {
  asyncData ({ $cloudinary }) {
    const src = this.$cloudinary.image.fetchRemote(
        'https://icatcare.org/app/uploads/2018/07/Thinking-of-getting-a-cat.png',
        {
          gravity: 'auto:subject',
          width: '200',
          height: 200,
          crop: 'fill',
          radius: 'max',
        }
      )

    return { src }
  }
}
</script>
From computed for dynamic urls
<template>
  <div>
    <img :src="src" alt="A remote image example with Cloudinary" />
  </div>
</template>
<script>
export default {
  data() {
    return {
      url: 'https://icatcare.org/app/uploads/2018/07/Thinking-of-getting-a-cat.png'
    }
  },
  computed: {
    src() {
      return this.$cloudinary.image.fetchRemote(
        this.url,
        {
          gravity: 'auto:subject',
          width: '200',
          height: 200,
          crop: 'fill',
          radius: 'max',
        }
      )
    }
  }
}
</script>
For readability and easy maintainance, you can also wrap this.$cloudinary.image.url inside a component method and call that method when needed instead:
<template>
  <div>
    <img :src="src" alt="A remote image example with Cloudinary" />
  </div>
</template>
<script>
export default {
  data() {
    return {
      url: 'https://icatcare.org/app/uploads/2018/07/Thinking-of-getting-a-cat.png'
    }
  },
  methods: {
    fetchRemote(url, options = {}) {
      return this.$cloudinary.image.fetchRemote(url, options)
    }
  },
  computed: {
    src() {
      return this.fetchRemote(
        this.url,
        {
          gravity: 'auto:subject',
          width: '200',
          height: 200,
          crop: 'fill',
          radius: 'max',
        }
      )
    }
  }
}
</script>